How to check whether you are correctly canted
and how to fix your boots if you aren’t
Signs and Symptoms
Before we start this discussion let me make something clear: Getting the alignment of your boots sorted out correctly will not transform a beginner into an expert skier. On the other hand, if your boots are not correctly canted you will suffer a significant handicap which will prevent you progressing easily or ever skiing as well as you could. Progress will be blocked and the root cause will not be recognised by the average ski instructor. Indeed, the better the instructor the more certain it is that they are among the fortunate few who have never suffered from serious misalignment of their boots. Never having had to adapt to a bad boot by adopting an awkward stance, they will usually assume that other people’s stance peculiarities are simply the result of poor technique. They are mistaken to hold this view, but it is easy to see why they do.
What is meant by the “cant angle” of a ski-
The first thing for you to do is recognise what signs and symptoms will reflect errors in boot alignment. Most people who have serious stance problems on skis have under-
So ask yourself a simple question. Do I ski in a knock knee position? Do I find myself concentrating on my outside ski and edging it by rolling that knee inwards? Do I look knock kneed on drag lifts? Any of these things suggest that your boots need more cant angle.
Under-
Why don’t instructors and other professional experts recognise this problem?
Some do. Ingemar Stenmark adjusted his canting constantly. Many of the best World Cup racers of today are equally committed, and some World Cup teams focus a lot of attention on the issue. But it is true to say that the average boot fitter does not recognise this is a problem with geometry, and the average ski instructor will simply try to teach skiers to adopt a ‘correct’ stance. Which will be impossible.
So, why the blindness? It is probably a consequence of the development of the plastic boot itself. Because children’s boots are traditionally manufactured without any built-
I believe that if you were to measure the canting requirement of most World Cup male skiers you would find that a very high proportion would be over-
Anyway, this is the heart of the problem I think. Top professionals undergo a natural selection because, within limits, over-
Most expert skiers will be blissfully unaware that others might experience any problem with the modern boot. If they become instructors they will naturally assume that stance issues are caused by technical errors and that they can train everyone to ski in a ‘correct position’. When they fail to achieve this result they simply conclude that many people are ‘bad at skiing’. For their part, boot-
Stuff Your Own Boots!
In a perfect world all skiers would be brought into alignment by adjusting the shaft angle of their boot cuff. Many boots do allow the cuff angle to be adjusted by moving one or both hinge points. Alas, the range of adjustment this allows is far too small for most skiers to be fully corrected this way. Professionals can grind the sole of your boot to achieve alignment, or fit wedged shims under the bindings. The former is a costly and irreversible modification, and even fitting canting shims presents difficulties. In fact simply getting hold of them is challenging as suppliers are paranoid about liability claims. By all means try to get professional help from specialist suppliers and boot fitters. But I have to say that this may prove difficult. My own preference is for a DIY solution, and one that allows trial and error optimisation of your boots while on the snow
If you take the trouble to construct the KPS Cant Gauge, it will allow you to measure the angular error that you suffer in your unmodified boots. You could use that measurement to have your boots ground or to specify the angle of shims to have fitted underneath your bindings. But you may not be convinced by any of this yet. And probably want an immediate solution to confirm that it works for you. So, initially at least, a DIY approach is best. You can always get help to tidy things up later.
Obviously, if you need more cant angle from your boot cuff the first thing you should do is adjust the hinges if your boots allow this. It is easy to become confused when adjusting cuff hinges so bear in mind that you must watch what happens to the cuff itself. Your adjustment should move the inside lower edge of the cuff upwards or the outside lower edge downwards, or make both of these changes if both hinges are adjustable. Compare the first boot you adjust to the one you haven’t touched to check that the cuff has angled outwards. The way these adjusters move the cuff varies, and it can be all too easy to simply move the whole cuff up or down, or to adjust the angle in the wrong direction. So take care with this and then carry on as below:
There is a really quick and easy way of canting the cuff to bring your boots into correct adjustment for your legs. The series of pictures on the next page will show you how to do it. It’s simple. Make an adjustment and then check out the result on the snow. See how it feels and don’t forget to check how your alignment looks on the Pomas. Then add some more packing material to the inside of the cuff of the boot and try it again. Work on it until it feels really good. Then check with the KPS Gauge, if you have made one. If the gauge shows that you are still out of alignment add even more material. I am prepared to bet that it will feel even better. Keep adding material until you are certain that you have gone far enough. Then add a little more to make sure that you really have reached optimum alignment. You may be surprised at how much correction your boots need. You may not be symmetrical and one leg need more canting than the other. Don’t get lazy, don’t give up, keep working at it. When you complete the process the result really will be worth the effort.
What material should you use? Anything that works. Carpet or carpet underlay works and can be stuck on with duct tape. John uses a very neat self-
Whatever material you use it will gradually be squeezed upwards out of the boot. If duct-
And use a washer to make it look professional…
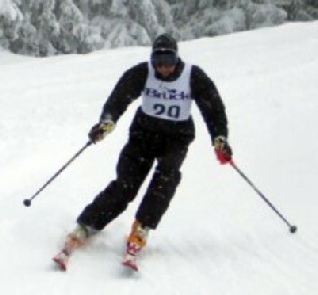
A classic stance adopted by the skier whose boots are not canted enough. Carving on the outside ski requires a conscious rolling of the knee.
The coach will tell this person to work harder at skiing in a less knock-
I know, because that skier was me.
The Magic Poma
Perhaps the best indication of your canting needs is the way you ride the Poma drag lifts. For those outside Europe I should add that the drag-
Incidentally, the awful T-
Another very telling symptom of canting problems is awkwardness when skating over a flat. Well aligned boots allow a skier to skate fluently and glide on one ski and then the other between the skating movements. An under-
This is a classic A-
And yet these boots are typical of those supplied to beginners!
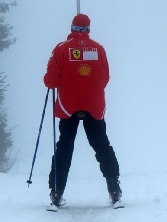
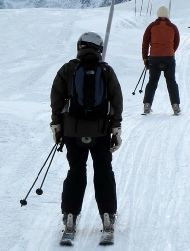
This is an experienced skier riding the Poma in a rather knock-
This is the X-
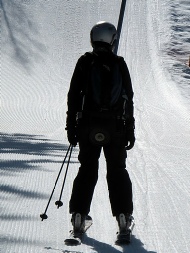
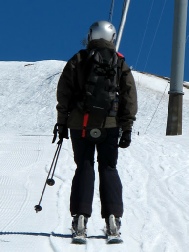
Here is the same skier in the same rental boots after they have been canted by simply adding material inside the cuff. The KPS-
Skiing became much easier for this novice after the modification.
Even the weather has improved!
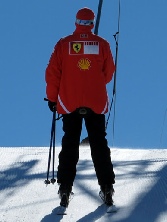
Now with shims inserted into the inside edge of the boot cuffs.
Visibly improved.
(Note that the skier ahead is very A-
More material added and the stance now looks very good. Skiing on and off piste became more relaxed and efficient.
This skier has an artificial knee. Anyone can benefit from canting.
By Peter White
Just a quick note for those who realise that the knee, although far from simple, is fundamentally a hinge-